

If you want to learn how to create a contact form in WordPress, the good news is that it only takes a few minutes with the right plugin. A contact form gives visitors an easy way to reach you without exposing your raw email address to spam bots and scrapers.
If you’ve ever put your email address directly on a website, you probably already know what happens next: spam. A lot of it. And the messages you actually want — real enquiries from real people — can easily get buried under junk or arrive without the information you need to respond properly.
A contact form solves most of that. It lets you collect useful details such as a visitor’s name, email address, subject, and message while keeping the whole process cleaner and more professional.
In this guide, we’ll use BoldForm to show you step by step how to create, configure, publish, and test a working contact form on your WordPress website.
Why bother with a form at all?
You could just publish your email. Plenty of sites still do. But a form gives you a few things an email link doesn’t:
- Your address doesn’t need to be publicly displayed, which can help reduce email scraping
- You control the structure — no more one-line “need help” emails with zero context
- It reads as more professional, especially for service businesses
- You can reuse the same builder later for quote requests, job applications, feedback forms, whatever comes up
Worth noting: a form isn’t magic. Depending on your hosting and mail configuration, the form can submit perfectly fine while the notification email never reaches your inbox. More on that below — email delivery is one of the most common issues people run into with WordPress forms.
What you’ll need
WordPress doesn’t ship with a complete form builder and submission-management system out of the box. For that, you’ll typically need a plugin.
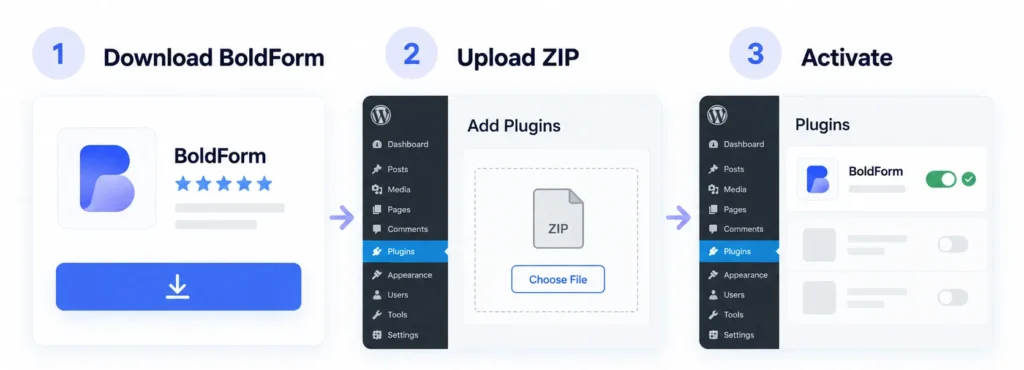
We’ll use BoldForm, which lets you build forms without HTML, PHP, or fiddling with shortcode attributes. The free version is enough for a standard contact form, and it also includes features such as conditional logic.
Get the free version of BoldForm directly from the official website and follow the steps below.
Step 1: Install BoldForm
Download the free ZIP from the official BoldForm website, Get BoldForm Free then in your WordPress dashboard go to:
Plugins → Add New Plugin → Upload Plugin
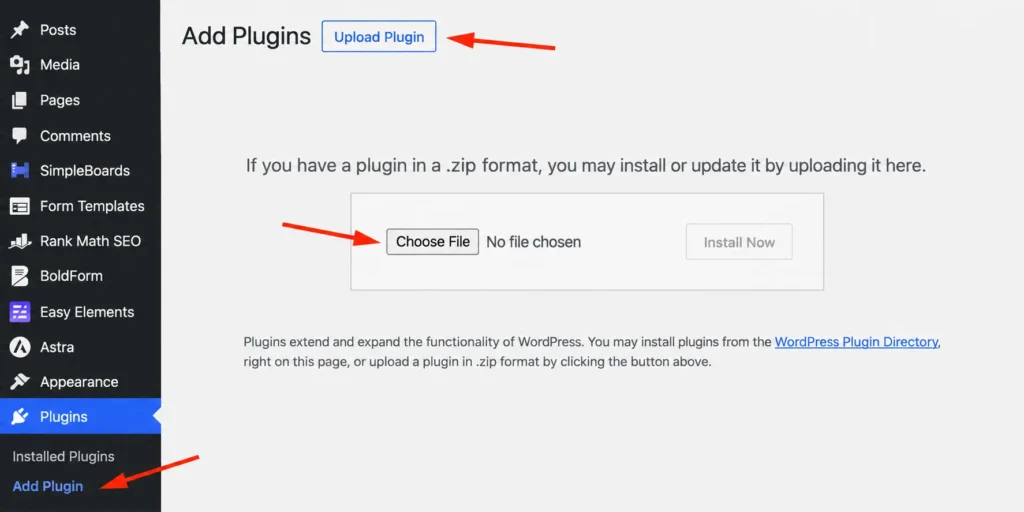
Pick the ZIP, hit Install Now, then Activate Plugin. That’s it — BoldForm now shows up in your dashboard sidebar.
Step 2: Build the form
Open BoldForm and start a new form. Name it something you’ll recognize later — “Contact Form” is fine, this is just for your own dashboard, visitors never see it.
For a standard contact page, you really only need:
- Name — so you know who’s writing
- Email — required, obviously, or you can’t reply
- Phone — optional, useful mainly if you’re a business that calls people back
- Subject — helps you triage before you even open the message
- Message — required, this is the whole point
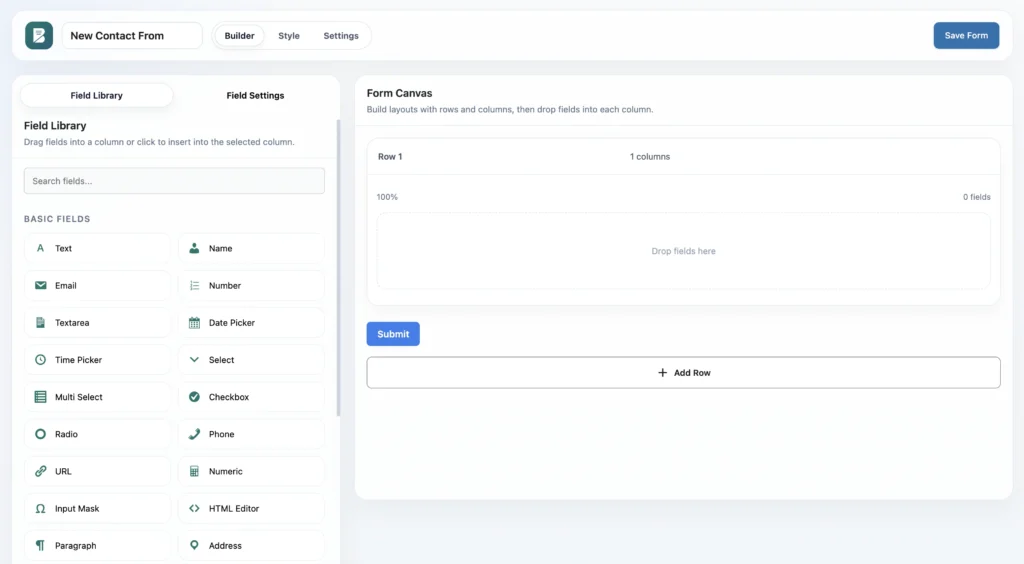
Resist the urge to add more fields “just in case.” Every extra field is another thing someone has to complete. If you don’t strictly need someone’s phone number before you can respond, make it optional or drop it.
Step 3: Tighten up the wording
Default labels work but sound a bit generic. Small edits here go a long way:
- “Message” → “How can we help?”
- “Submit” → “Send Message”
None of this affects functionality, but it makes the form feel like it was actually built for your business rather than copy-pasted from a template — because, well, half the internet’s contact forms are.
Step 4: Set up email notifications
This is the step people skip and then wonder why they never hear from anyone. Open the form’s notification settings and set:
- Recipient — where the enquiry actually lands (
support@yourdomain.com, or wherever) - Reply-To — set this to the visitor’s email, not yours. Hit reply on the notification and it should go straight to them rather than back to your own inbox
- Subject line — something like “New Contact Form Submission” is fine, nobody’s grading you on creativity here
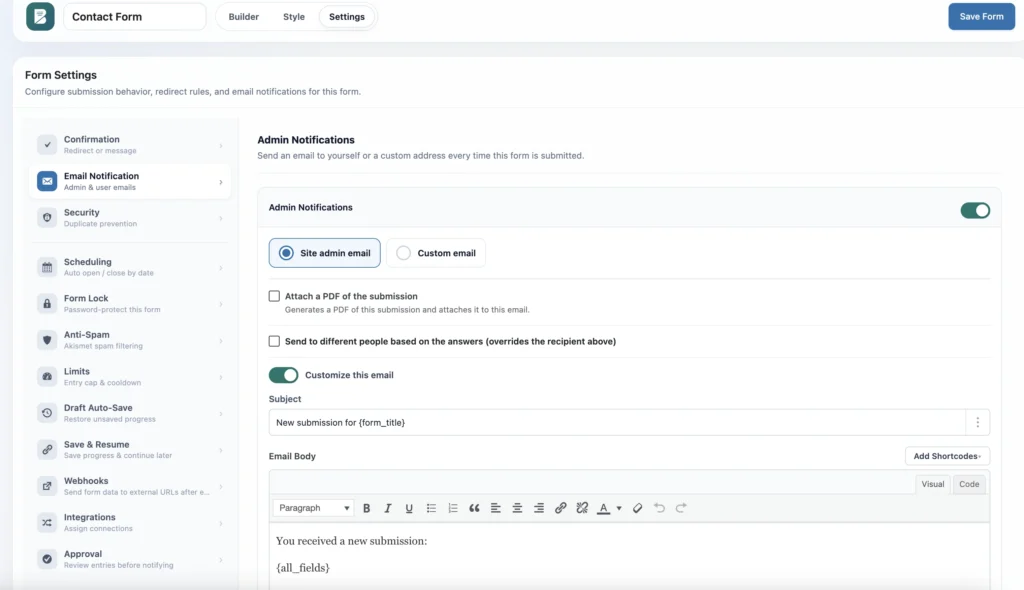
One important caveat: WordPress email delivery can sometimes be unreliable depending on your hosting, DNS, and mail configuration. If notifications go missing, the form may still be submitting correctly while the server fails to deliver the email.
Setting up SMTP with a WordPress SMTP plugin can often improve delivery reliability significantly. Don’t skip testing this — make sure you’ve actually received a notification before assuming everything is working.
Step 5: Put the form on a page
Create a new page — Pages → Add New, call it “Contact Us” — and add your BoldForm form using the available block, widget, or supported embed method.
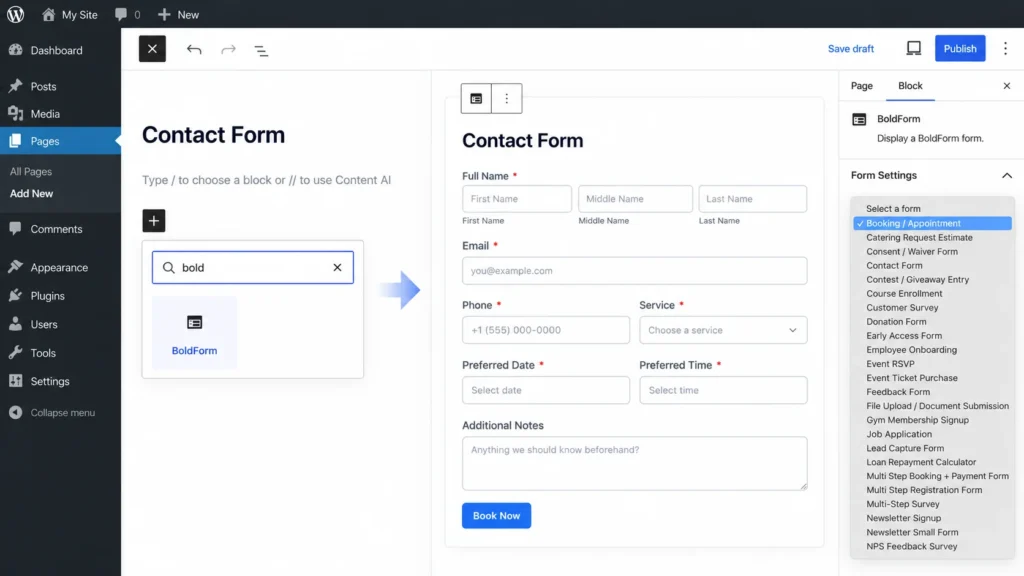
Add a line of intro copy above it so it doesn’t feel like a bare form floating on an empty page:
Have a question about our services? Send us a message below and we’ll get back to you shortly.
Preview it, check it doesn’t look broken, publish.
Using Gutenberg
Open your Contact page in the WordPress block editor, add the appropriate BoldForm block or supported embed option, and select your form.
Preview on both desktop and mobile before you publish; form layouts can behave differently on smaller screens depending on your theme and page structure.
Using Elementor
Add the BoldForm form using the supported BoldForm widget or embed method available in your setup.
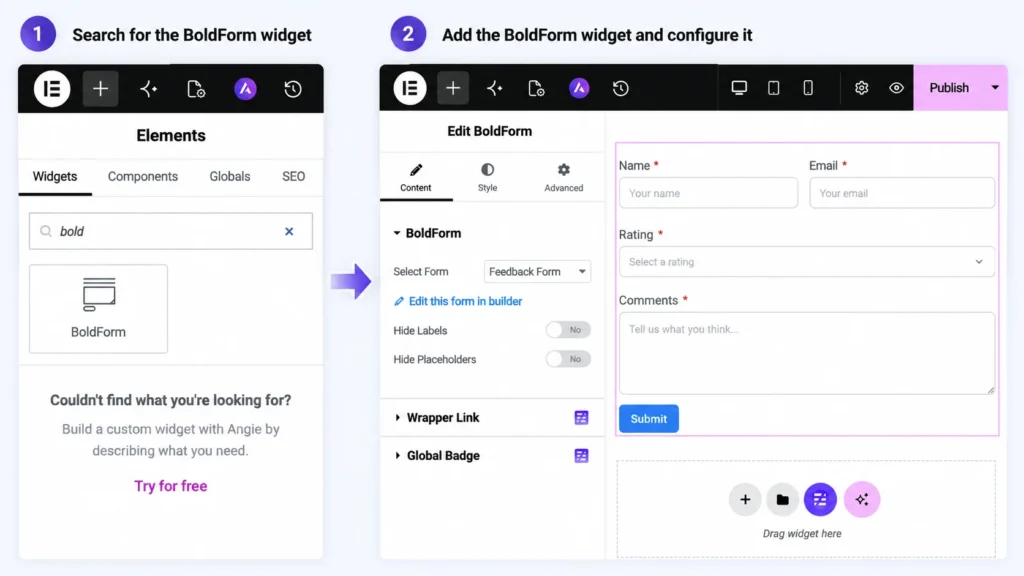
This is also where you can build out a proper two-column contact layout — form on one side, address/phone/map on the other — instead of a lonely form sitting in the middle of the page.
Actually test it before you send anyone there
This part gets skipped constantly, and it’s one of the main reasons people end up thinking their contact form doesn’t work. Before you consider it done:
- Submit without filling required fields — you should get a clear validation error, not a silent failure
- Enter a broken email like
test@— it should get rejected - Submit a complete, valid entry and confirm you see a success message
- Check your inbox (and spam folder — always the spam folder) for the notification
- Hit reply on that notification and confirm it’s addressed to the visitor, not back to yourself
- Open the page on your phone — check tap targets, check nothing overlaps, check the button is actually visible without scrolling sideways
Six checks, a few minutes, and it’ll save you from the awkward situation where your form has been quietly missing enquiries without you realizing it.
What fields does a good contact form need?
There’s no universal answer — it depends on the business — but here’s a sane default:
| Field | Should it be required? |
|---|---|
| Name | Yes |
| Yes | |
| Phone | No |
| Subject | No |
| Message | Yes |
If you run something more specific, adjust accordingly:
- Agencies often add: website URL, project type, rough budget
- Service businesses: what service, location, preferred appointment time
- Support teams: product, order number, issue category
Just don’t turn a simple “get in touch” form into a ten-field intake questionnaire unless you genuinely process that data downstream. Nobody wants to fill out a long form to ask a quick question.
Keeping spam under control
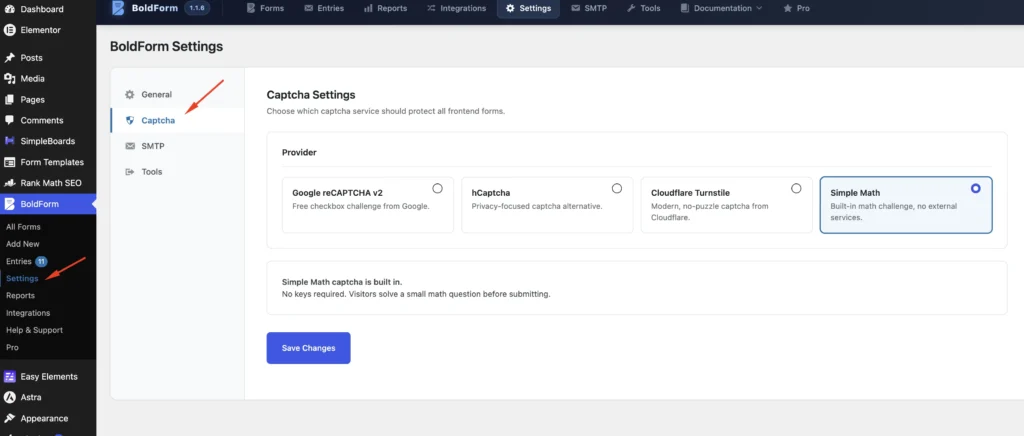
Once a site gets any real traffic, bots may eventually find the form. A few things that help:
- Turn on the spam-protection options available in your BoldForm setup
- If you’re using honeypot protection, it can help catch automated submissions without showing a CAPTCHA to real visitors
- Keep your email address off unnecessary public pages — the less it’s scraped, the less email spam you may attract
- Keep WordPress core, your theme, and plugins updated
- If you suddenly get a wave of near-identical messages with random links, that’s probably automated spam — review your form’s spam-protection settings
When things go wrong
Notifications not arriving — check the recipient address first, then your spam folder, then consider SMTP. If the form submits successfully but the email never arrives, the issue may be with WordPress email delivery or your hosting configuration rather than the form itself.
Form not showing on the page — confirm BoldForm is activated, the right form is selected, and you actually hit update/publish after adding it. If your site uses caching, clear the cache and test again.
Looks fine on desktop, broken on mobile — it may be a theme or page-builder container issue rather than the form itself. Test at a few different widths and check the surrounding layout settings.
Too much spam — review your spam-protection settings first. Avoid adding unnecessary friction for genuine visitors unless the existing protection isn’t enough.

FAQ
If you’re still unsure how to create a contact form in WordPress, these common questions may help.
Can I do this without any coding?
Yes — that’s the entire point of using a builder like BoldForm.
Does WordPress have a contact form built in?
Not really. WordPress core doesn’t include a complete contact form builder and submission-management system, which is why most sites use a dedicated form plugin.
Is BoldForm free?
Yes. The free version of BoldForm is available directly from the official BoldForm website. Download the ZIP file and upload it from Plugins → Add New Plugin → Upload Plugin. The free version is enough to create a standard contact form and also includes conditional logic.
Why aren’t my form emails arriving?
It may be a mail-delivery issue rather than a problem with the form itself. Check the recipient address and spam folder first. If delivery is still unreliable, configuring SMTP is a good next step.
How short should a contact form be?
Three to five fields covers many common contact-form use cases. Add more only when you genuinely need and use that extra information.
Wrapping up
The whole process is really just: install BoldForm, build the form, tidy up the labels, wire up notifications properly, drop it on a page, and — this is the part people skip — actually test it before sending traffic there.
Start with Name, Email, and Message. You can always add fields later once you know what visitors are actually asking about.
Ready to build your contact form?
Download BoldForm Free and create your first WordPress form today.
