

Nobody likes landing on a form with twenty fields staring back at them. Most visitors glance at it, do the math on how long it’ll take, and close the tab. A multi-step form fixes that by breaking one long form into smaller, more manageable sections — so instead of one intimidating wall, visitors just answer a few questions at a time.
In this guide, we’ll walk through building create a multi-step form in WordPress using BoldForm’s visual builder. No code required.
What Exactly Is a Multi-Step Form?
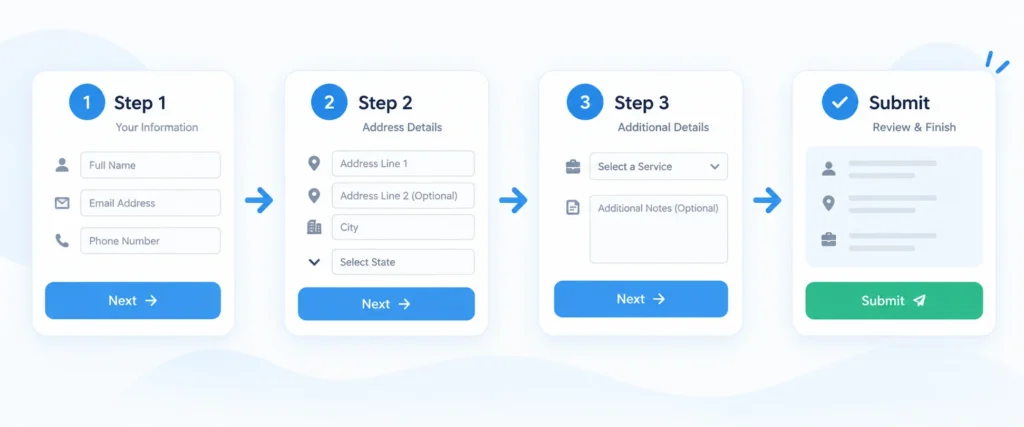
It’s a form split across several “pages” or steps instead of one long scroll. Say you need to collect a name, email, phone, address, company details, service selection, budget, a file upload, and some notes. Dump all of that on one page and it looks like a job application. Split it like this instead:
- Step 1: Name, email, phone
- Step 2: Service, budget, project requirements
- Step 3: File upload and comments
- Step 4: Review and submit
Same amount of information, but visitors only see what’s relevant right now. It feels lighter, even though nothing about the actual workload has changed.
Why Bother With Multiple Steps?
A few reasons this tends to work better than a single long form:
- Less intimidating. Five fields at a time is a lot easier to commit to than twenty all at once.
- Better organization. Grouping related fields — personal info, then business info, then requirements — gives the form a logical flow instead of a random field dump.
- Clear progress. A progress bar tells people how much is left, which matters more than you’d think for keeping them from abandoning halfway through. BoldForm has this built in.
- Friendlier on mobile. Long forms are rough on small screens. Shorter steps keep things from feeling cramped.
This approach works especially well for quote requests, job applications, client onboarding, event registrations, and anything else that needs more than a handful of fields.
Building the Form in BoldForm
You don’t need PHP, JavaScript, or CSS for any of this — it’s all handled through the visual builder and something called Step Breaks, which is exactly what it sounds like: a marker that tells BoldForm “everything past this point is the next step.”
1. Install BoldForm
Download the free ZIP from the official BoldForm website, Get BoldForm Free then in your WordPress dashboard go to:
Plugins → Add New Plugin → Upload Plugin
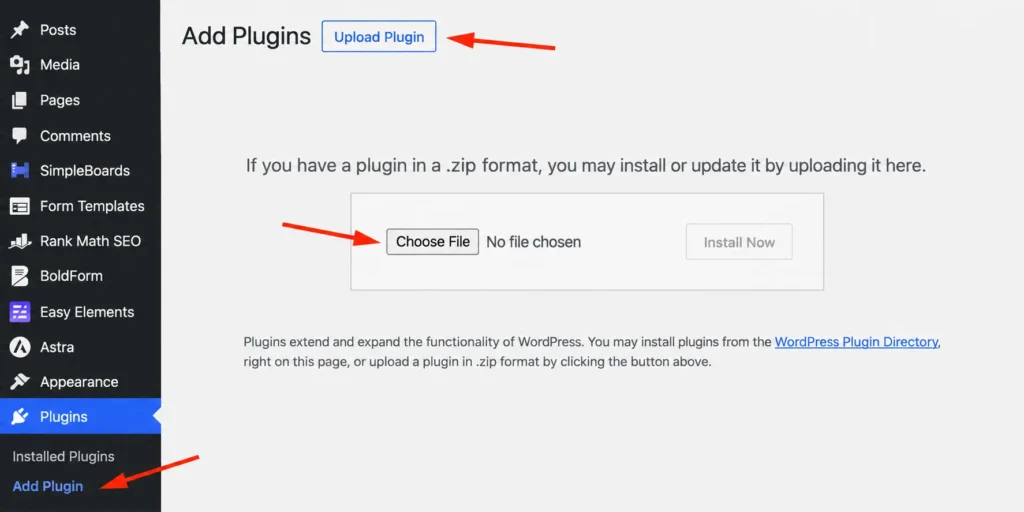
Pick the ZIP, hit Install Now, then Activate Plugin. That’s it — BoldForm now shows up in your dashboard sidebar.
2. Plan your steps before you build
It helps to sketch out your sections on paper (or a notes app) before touching the builder. For a project request form, that might look like:
- Contact Information — name, email, phone
- Project Details — service, budget, website URL
- Requirements — project description, file upload
- Confirmation — terms and conditions, submit
Knowing this upfront makes it much easier to decide where each Step Break should go.
3. Add your fields
Use BoldForm’s drag-and-drop visual builder to add the fields your form needs — such as name, email, dropdowns, number fields, URL fields, and more. Add them in the order you planned, keeping related fields together within each section.
For example, you might group contact details in the first step, project information in the second, and additional requirements in the third.
4. Insert Step Breaks
After the fields for your first section, drop in a Page Break. Everything above it becomes Step 1; everything below becomes Step 2. Repeat wherever you want a new section to start:
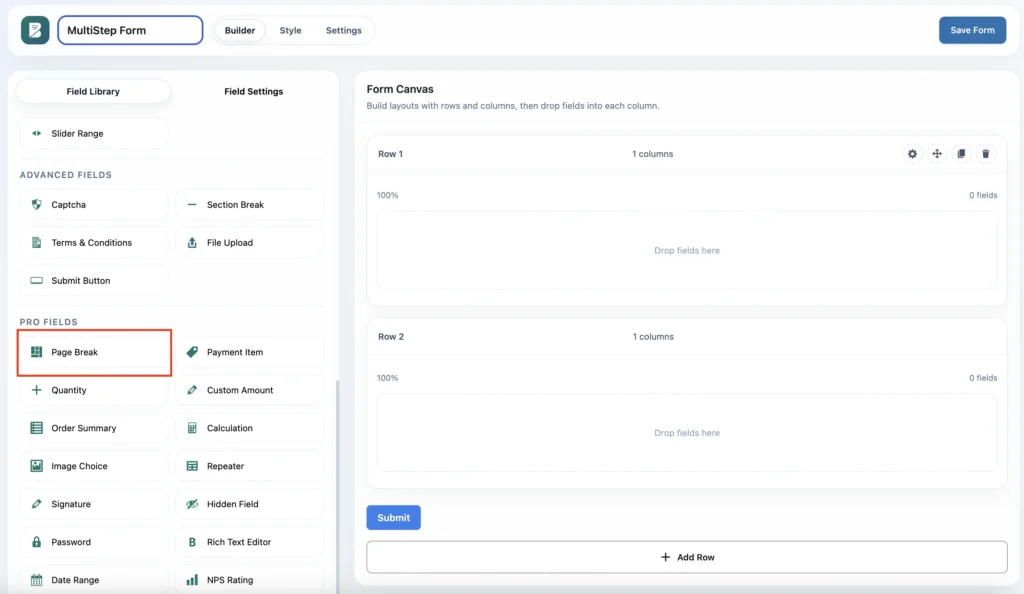
Name, Email, Phone
--- Page Break ---
Service, Budget, Website URL
--- Page Break ---
Project Description, File Upload
--- Page Break ---
Terms & Conditions, Submit
That’s a four-step form built from nothing more than field order and a few breaks.
5. Set up navigation and progress
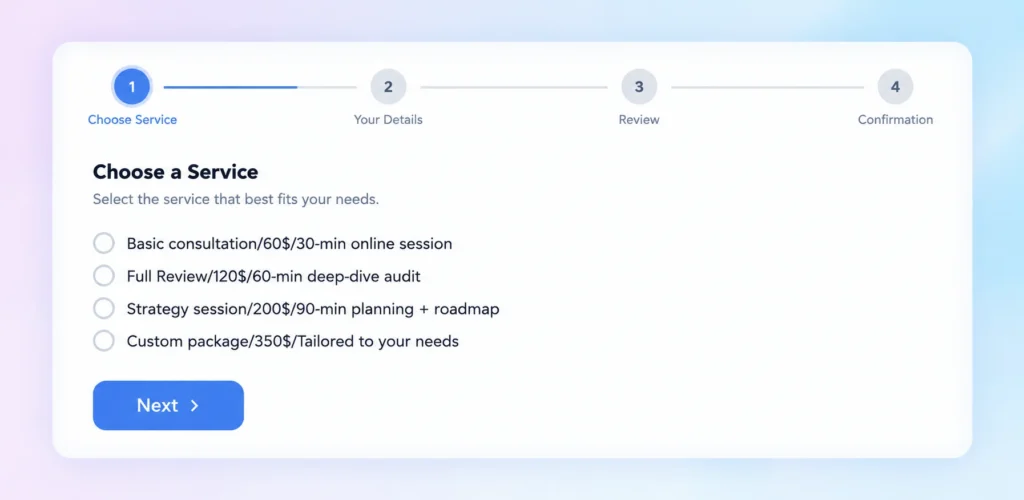
BoldForm gives you Previous/Next navigation and a progress indicator out of the box, and both are worth configuring properly. Keep button labels short and obvious — “Next Step,” “Continue,” “Back” — and save anything more specific for the final button (more on that below). A visible step counter or progress bar (“Step 2 of 4”) reassures people they’re not signing up for an endless questionnaire.
6. Decide what’s actually required
Not every field needs to be mandatory. Go through your form and ask, honestly, whether you need each piece of information to move forward. In a typical quote request, name, email, and service selection are worth requiring — phone number and file upload usually aren’t. Every required field you add is one more reason someone might bail.
7. Use conditional logic to keep things relevant
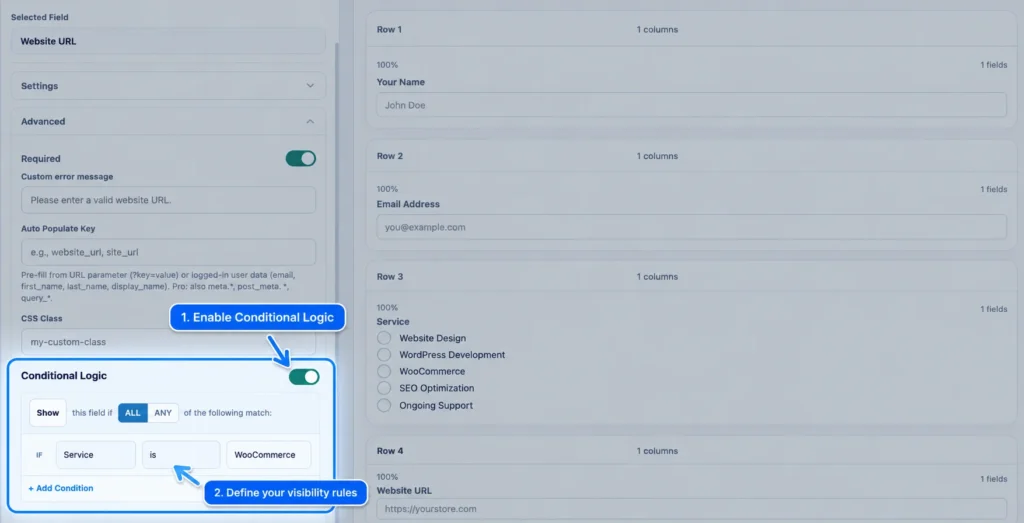
This is where multi-step forms get genuinely useful instead of just cosmetic. If someone selects “WooCommerce” as their service, you can show WooCommerce-specific follow-up questions and hide them entirely if someone picks “Maintenance” instead. BoldForm supports this natively, and it keeps the form from asking people questions that don’t apply to them.
8. Match the form to your site’s design
A form that looks bolted onto your theme is a small but real trust signal — in the wrong direction. Adjust spacing, typography, button styling, and form width so it feels like part of the page rather than an embed from somewhere else. You don’t need anything fancy here; clean spacing and one clear primary button will outperform an over-designed form most of the time.
9. Preview it like a visitor would
Before it goes live, actually go through the form yourself, start to finish. Check that Next and Previous work, required fields validate properly, the progress bar tracks accurately, conditional logic shows and hides the right fields, and the whole thing holds up on mobile. It’s easy to catch these issues in five minutes of testing and much more annoying to catch them after a lead has already given up halfway through.
10. Publish
Once it checks out, place the form wherever makes sense — a dedicated landing page like /get-a-quote/ works well, since it keeps the page focused instead of surrounding the form with distractions. BoldForm works with Gutenberg, Elementor, and plain shortcodes, so it’ll fit into most existing WordPress setups.
A Quick Example
Picture a web agency that wants to replace a fifteen-field quote request with something less exhausting:
- Step 1 — About You: name, email, company
- Step 2 — Your Project: service needed, existing website?, URL
- Step 3 — Budget & Timeline: estimated budget, desired launch date
- Step 4 — Project Details: description, file upload
- Step 5 — Submit: terms, submit button
Same fifteen questions, but nobody sees more than three or four at once.
A Few Things Worth Getting Right
- Group fields with intent. “Contact → Business → Requirements → Confirmation” makes sense. Randomly scattering email, budget, and phone number across different steps doesn’t.
- Keep steps short. Three to six fields per step is a reasonable range — enough to feel like progress, not enough to feel like another full page.
- Front-load the easy questions. Name and email first, budget and project scope later. Let people build momentum before asking for anything that takes thought.
- Don’t overdo the step count. Splitting ten fields into ten separate steps just adds nine extra clicks. Use enough steps to stay organized, not to pad out the experience.
- Make the final button unmistakable. “Submit Request” or “Send Application” — not “Next.” People should know they’re finishing, not moving to another page.
Do You Even Need Multiple Steps?
Not always. A basic contact form — name, email, message — is usually better off staying as one page. Multi-step forms earn their keep once you’re collecting enough information that grouping it actually helps: quote requests, applications, onboarding, detailed surveys. For anything shorter, adding steps is just extra friction dressed up as good UX.
| Single-Step Form | Multi-Step Form |
|---|---|
| Best for short forms | Best for longer forms |
| All fields visible at once | Fields grouped into sections |
| Fewer clicks | More structured, guided flow |
| Good for basic contact forms | Good for applications, quotes, onboarding |
The goal isn’t to make every form multi-step — it’s to pick whichever format gets more people to actually finish filling it out.
Build Better Multi-Step Forms with BoldForm
A long form doesn’t have to feel like a long form.
By grouping related questions into smaller steps, you can make quote requests, applications, onboarding forms, and other complex forms much easier to work through.
With BoldForm, you can build multi-step forms visually using Step Breaks, Previous and Next navigation, progress indicators, conditional logic, and responsive form layouts—without writing custom code.
The important part isn’t adding as many steps as possible. It’s giving visitors a clear, logical path from the first question to the final submission.
If your current WordPress form feels too long or overwhelming, breaking it into a few well-organized steps is a good place to start.
Ready to build your multi-step form? Try BoldForm and create it visually without coding.
FAQ
What is a multi-step form in WordPress?
A form split into several smaller sections that visitors complete one at a time instead of all at once.
Do I need to code anything?
No. BoldForm’s visual builder handles the whole thing through drag-and-drop fields and Step Breaks.
How do I add steps in BoldForm?
Build your form as usual, then insert a Step Break wherever you want a new section to begin.
Does BoldForm show a progress indicator?
Yes, it’s built in for multi-step forms.
Can visitors go back a step?
Yes — Previous and Next navigation is supported by default.
Is it mobile-friendly?
BoldForm forms adapt across desktop, tablet, and mobile, but it’s still worth previewing on a real phone before publishing.
Can I combine this with conditional logic?
Yes, and it’s one of the more useful combinations — showing or hiding fields based on earlier answers keeps the form relevant to each visitor.
Should every form be multi-step?
No. Short forms like a basic contact form usually work better as a single page. Save multi-step for forms with enough fields to actually benefit from grouping.

